Showing posts with label Cotton. Show all posts

4 Jul 2014

Colette Sorbetto number 2 AKA (Happy Sewing Sorbetto)


In my last post I mentioned I had made a sorbetto.  Well this is it and I love it.  I love it so much that I wore it to the NYLon 2014

What do I love about this.

I love that there is a fabric store just down the road from me that I can but cotton prints.  Up till now I have had to have fabric shop binges as there wasn't a fabric store nearby with cute fabric (nearest 20 miles away). So I love that I can make another one of these soon.

I love that its a bit longer. The first one was just a bit too short

I love that my grading adjustment fits so well - no gaping armholes and back or tight across the bust.  I have worn this top so many time and it always cheers me up 

But most of all I love that it will always remind me of the NyLon 2014 and all the lovely bloggers I met. Thank you to Rachel (House of Pinheiro)for organising such a fun event. Next time I will remember to take some photos in between fabric shopping (got a bit carried away) Howeverhere is a photo of everyone from the day taken the lovely Kitty Wong. Our very talented official photographer for the day.

source Kitty Wong


25 Jun 2014

part 2 The sleeveless woven top


So the next make I made was this - well actually it wasn't I made a Colette Sorbetto before this one.  The only problem was it didn't fit at all. Will discuss the successful one next week.

I made it using navy polka dot material (which was left over from my ByHand London Victoria) and it only took a few hours to make although I think after making one, future Sorbettos are much quicker.

The problems with my navy Sorbetto is that it is too tight around the front and far too short for my personal preference.  I definitely would not be able to raise my arms.

It fitted around the back fine and the pleated front is a really sweet and simple to do feature.  I used plain navy bias binding for the neck and arms.  Really love the navy spot and will make another as it would be so versatile.  I plan to make further Sorbettos but longer and  more generous around the front.  There are also so many variations of this pattern and the best thing of all its completely free and instantly available as a printable download.  This did however allow me to practice and so although not wearable, as a toile it worked really well. So I'm counting it as a success.  I also got better with practice making neat binded seams.


14 Aug 2013

The fabulous and wonderful Mathilde Alma

I would not have been able to complete this challenge without using a Tilly pattern.  Back in January I decided that I would like to do some sewing.  I Googled simple sewing projects for beginners and found a link to Tilly's site.  It was so easy to read I think I read the whole thing.  When I had finished I had moved away from just wanting to sew a cushion cover to wanting to sew my own wardrobe and I wanted my own blog. I was completely inspired. It therefore made perfect sense to include her first pattern into my challenge.

I have finally completed this blouse and wanted to share with you.  It was so much fun to make and to be honest this is actually my second version.  I started this just after completing Colette Ginger and it was, for me, a step too far.  That's not to say that this is a difficult pattern, more that for a third ever make, I was not ready for it possibly a little over ambitious.

The problem with the first version
My first version was navy and white polka dot crepe de chine.  This I believe was a major problem because the fabric although beautiful and drapy was also a slippery little creature.  I also cut it out with scissors.  When I think about it now, these both combined  meant that the pieces I cut really had no bearing on the pattern and that was just the start of my problems. The neckline and the pleats were wonderful and challenging and really fun to make.  Tilly's instructions make it very easy to follow as do the wonderful tutorials on her site. My real problem came with the seven button holes.  I had not done button holes before.  i have also lost the manual for my machine. I tried to guess, starting at the bottom as this I thought would be least obvious.  The first one went well but with each successive buttonhole they got worse. The button holes were a disaster. I gave up on the project.  then...

The practically perfect second version


So I started a second version this time using a lovely navy cotton poplin star print.  

  Far easier to work with I wondered why I didn't use cotton more often.  I cut it with my rotary cutter and the pieces looked just like the pattern;  This made assembly sooo easy.The pleats were a joy and I even added  some crochet lace detail between the yoke and the front - an idea stolen borrowed from Lauren Guthrie.
   
The sleeves were not for me and so the I also borrowed the cap sleeve idea using Sewaholic's Alma as a pattern.  I also love those seven large buttons on the back.
v

To remember
If you are new to sewing this is a perfect pattern just don't use a slippery fabric - cotton poplin is cheap and perfect for the capped sleeve version and widely available in lots of gorgeous patterns.  Use a rotary cutter although with care they are very sharp.  You get a very accurate cut and accuracy does make sewing much easier. Do follow all the steps from Tilly's site, both the instructions and photos are brilliant.  Try not to lose the manual for your sewing machine.  Practice buttonholes over and over until they are perfect before moving onto the garment.

I will be making another Mathilde although again with cap sleeves.  This is only make three  of my 12 makes so I hope to make another Mathilde in the new year.  The next pattern I will be making April Rhodes Staple dress.  Have you made this?  I chose it for the pockets and the easy styling.


31 Jul 2013

Colette Hawthorn - 19 hour dress

Untitled by SewSleepy
pattern matching or happy accident

Grunge Hawthorn Front by SewSleepy
the front
I had been intending to make this dress from the moment the contest was launched.  I say from then because, the previous day when the dress was launched I was very underwhelmed.  You see it was another dress - I had just made two Laurels.  It was a dress that looks like it would need ironing, had aprox 1000 buttons and I've never worn a shirt dress in my life - well they never fit in the shops so I've never bought one.  So when the contest was announced it was my competitive side that made me buy the pattern.

So the pattern sat on my computer waiting for me to download it whilst I busied myself with finishing off a few other projects and generally avoiding it.  Anyway last Friday I remembered that it needed to be made before Sunday and so went fabric shopping.  I had been looking online and had seen some lovely fabric - a violet chambray, a blue cherries and flower print, purple gingham and a multicoloured seersucker plaid but had not got round to ordering them so fabric shop on the way home it was.

 It was 20 minutes before the shop closed and so I rushed around like a crazy lady trying to find the most fabulous fabric. I had vowed to stay away from anything where the pattern would need to be matched so imagine my surprise on returning home  to have bought grey, black and blue cotton plaid - puzzled look???

Untitled by SewSleepy
the back
I then went camping for two days - on my return and very sleepy-  i decided to start the dress; and whats more set about completing it in time for the contest,  well it finishes PST so there was plenty of time.

I printed it out, stuck it together and cut it out and then set about cutting out the fabric.  I have never liked this bit so tried using cutting mat and cutting wheel instead of shears.  Not sure if its a combination of the cotton and the wheel but the finished pieces looked really like the template.  My confidence increased and so I set about making the dress.  Using both the sewalong tutorial and the pattern instructions it was a breeze and when I finished for the day (3am) I had completed the collar and the bodice and just needed to attach the skirt and buttons.

I woke up at 8am and started again.  Trying to be quick I made two mistakes when attaching the skirt pieces together and attaching the skirt to the bodice which both had to be carefully unpicked and sewed together again.  Both involved not checking before sewing.  Seams showing on the outside is not a good look.

Well that just left the buttonholes and buttons - The sewalong suggested looking at the manual for my sewing machine, I had lost this so practised with a scrap of felt until I had mastered it.  I am very proud of the buttonholes - so neat. Then there's the slow process of sewing on the buttons and the hem.

Untitled by SewSleepy
the inside -
check out the bias binding at the arms
So all in all the dress took 24 hours - well 19 if you take out sleeping.  I mentioned at the beginning that I don't own any shirt dresses and I think I know why now.  Like all shop bought clothes it is made for an average person and I am not average.  My body shape does not have any very obvious places where adjustments would need to be made but on shop dresses the buttons around the bust would be pulled too tight or in the next size up the back would not be fitted.  I did not do a FBA but I did take the seams out on the sides from 5/8 to 1/4. Also shop dresses are straight cut and not the beautifully flattering circle skirt.  This shape skirt is very practical to move in yet very feminine to.

How do I feel about my dress?  Well i love it!!! its a perfect combination of 50's housewife uber femme and grungy 90's throwback.  Also perfect camouflage when picnicking.   I am also very proud of the attention to detail and how far i have come since January when i started sewing clothes.  Thank you Sarai for pushing me out of my comfort zone each time and supporting me with brilliant patterns and tutorials.

The dress has been placed onto Flickr and you never know the 19 hour dress may just make it though to the second round of the contest,  fingers crossed

UPDATE - It didn't make it through to the second round - sad face.  But I still get to wear it and wear it i shall.  I love this pattern and |I am already planning on making some new ones.  Also if you haven't already go place your votes there are some beautiful versions out there and  some great inspiration if you've not yet made this pattern.  Oh and feel free to leave a comment too.


29 Jul 2013

Colette hawthorn update

Untitled by SewSleepy


Grunge Hawthorn Front by SewSleepy
After a fabulous weekend camping I got back home in the mood for sewing.  So I whipped up a Hawthorn in a day.  This is an intermediate pattern -  but don't be scared.  The hardest part for me was finding a supply of 15 buttons.

The fabric is plaid cotton and is so lovely.  The collar took the longest but the rest just assembled itself - well not literally.  I had hoped to put it in the contest and it looked like I was too late  - very sad face -but fortunately there is to be a second round so fingers crossed my beautiful grungy picnic blanket dress will go through.  Either way I win as I get to wear it.  If the weather stays good I will be taking it to the zoo tomorrow.

Full write up tomorow...

24 Jan 2013

My week in Sewing. Wow what a busy week.

Well lots to report on this week.

I ordered some lovely fabrics (more on this later) and started my first project, Sewaholic's Alma blouse.  Looking at other blogs I was under the impression that this would take me (a complete beginner) a weekend.

Cautiously I began on Friday.  Starting with trying to work out my measurements and using measurement chart found through Tilly's Blog by Miss P. Once I worked out my measurements I decided to go for the 8 and started to cut my pattern and fabric.  The fabric I was using was an old cotton valance as this was going to be a muslin.

On Saturday I started sewing.  Cue first problem. My darts were awful I didn't know how to do a dart and I had to do 6.  After some Google research i found this video and was able to complete my 6 darts.  I also found a video on how to use a seam ripper as i was spending a lot of time ripping seems in a very inefficient way.

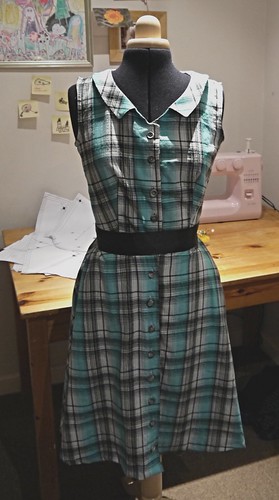
Sunday I made the collar - I didn't have any interfacing but this is a run through so didn't worry to much and was very happy with the shape of the collar. Especially how it met in the middle.  Not sure that I'm a peter pan collar kinda girl though so may try doing the other two collars in the real version.

Monday ordered an invisible zip from.

Tuesday Zip arrived and went about the complex and counter intuitive process of invisible zippers.  Used the Colleterie video to help me. First attempt was really good on one side and not the other.  I had gone over the teeth of the zip and the zip would not do up.  Hadn't realized to switch the position of my needle and had gone over the zip.  Used the seam ripper and tried again.  This time better, the zip goes up but is far from invisible   Used the seam ripper again

Wednesday, tried again with the zip.  third time and this much better almost invisible.  Will leave this now and move on to the sleeves.  Used this video on seam easing.  Then used this video on sleeve finishing.  I have at the moment one sleeve on the muslin.  I also have another sleeve ready to put on today and I need to hem the bottom.  Hopefully then first make has taken ,just one week.  Look forward to trying on when its complete.

My thoughts on this pattern.
This is advertised as an intermediate pattern.  I wish I had started with something easier to begin with...but I have learnt some really good skills this week and am confident that I could make this pattern again.

What went well
1. The sizing is good
2. The darts were easier than I thought they would be
3. The invisible zip is a challenge but definitely worth it
4. Sleeves were easier than I thought and made it feel like proper dressmaking

What I don't like
1.  I'm not sure that I'm a peter pan collar person
2. Plain fabric shows off your mistakes

What I will do next time
1. Use the same size
2. Choose an invisible zip to match the fabric
3. try the cap sleeve version
4. try the other two necklines
5. Use a patterned fabric

Fabrics

Yes I've been shopping.  With so many different fabric stores online it would be wrong to not try them all - wouldn't it?

Liberty print corduroy- Isla Rose-  Sewbox
Navy crepe backed satin - Fabric Godmother
Navy corduroy
Fusia floral viscose
Navy cotton poplin stars
Navy cotton poplin stripe- Remnant House

I'm now not allowed to buy any more fabric until I have used up this little stash.

Patterns

Have bought some more patterns too.  Colettes peony pattern. McCalls 2401

I'm not allowed to buy any more patterns... well except maybe some trousers.


17 Jan 2013

New year New blog

Inspired by some lovely makes on Tilly's blog, I have decided to have a go.  I begrudge walking around stores trying on ill fitting clothes and feel that the time has come to make my own clothes.  I had tinkered with this idea two years ago but could not find fabrics or patterns that inspired me.  I have chosen to start a blog as a way of tracking my progress and a way of recording successes and pitfalls along the way.  I plan to post once a week. I have also seen the way bloggers support each other with ideas and really why wouldn't I want to be part of that. That's all for today. Thank you for reading.

UPDATE

Postie has been and the beautiful fabric and pattern that I bought from Sew Over It has arrived.  Nicely wrapped and exciting to open.  It contained Colette pattern Hazel for the summer, grey and white ditsy floral  chiffon and green and cream polka dot cotton. I have the Alma blouse pattern on order so I think I will make a spotty blouse first.  Also before I forget I have got the Cal Patch book and hope to work my way through it.  Need to source some navy blue corduroy for the basic skirt.